 | Designing Web Audio |  |

The challenge to good recording is reproducing as accurately as possible a sound source without introducing system noise, distortion, or other unwanted artifacts. In theory, capturing sound is a relatively simple process: set up a microphone, run it through a microphone pre-amp or a mixing console, connect the output to a sound card or a digital tape machine, adjust the input level, and press record.
In the real world, however, good recording is complicated by elements such as wind, crowd noise, poor room reflections, sudden volume peaks, and the wide tonal range of musical instruments and voices. The tools for preventing or overcoming these obstacles are proper equipment and good recording techniques.
Whether you are adding rollover sound effects, background music loops, or narration to your site, the first step is to gather your source material. Music and sound effects can be collected easily from prerecorded, royalty-free music or sound effects libraries. However, if you are recording voice-over narration, a live concert, or an on-location interview, you will have to record the sound yourself.
Using the appropriate equipment helps you produce high-quality audio. Resolution is the key difference between low-end and high-end audio gear. Professional-grade audio equipment captures higher fidelity sound and preserves the subtleties and nuances of the original source without adding unwanted system noise or distortion.
Applying solid recording techniques is more important than simply buying expensive equipment, however. Get the highest-quality gear your budget allows, then learn how each piece operates so you get the best possible signal. In this section, we'll examine the following types of equipment:
Microphones
Microphone pre-amps
Mixers
Compressors and limiters
Studio reference speakers
DAT recorders
Headphones
Pop screens
High-quality cables
If you are in the market for any of this equipment, consult Appendix A, "Creating the Ultimate Web Sound Studio: Buyers Guide and Web Resources" for our recommendations.
You get what you pay for
The dynamic range of audio equipment is the difference between the loudest sound the system can record before distortion and the softest signal recorded without being overcome by the noise floor, the level of ambient noise in the recording. This range is measured by the signal-to-noise ratio. The signal is the actual sound you're after; noise is any hiss or other artifact introduced by the amplifier, the microphone, or the other electrical components of the audio system. High-end equipment produces a +95dB or greater signal-to-noise ratio, which introduces less system noise to your audio. Cheaper equipment produces a +80dB or lower signal-to-noise ratio, which introduces more noise.
Selecting a microphone suitable for your recording situation is crucial to capturing a good signal -- and one of the best ways to meet the recording challenges you will face out in the field where you can't control background noise. The two factors to consider when choosing a microphone are:
Its transducer design, or the method of converting sound waves into electrical waveforms
Its directionality, or pick-up pattern of surrounding sounds
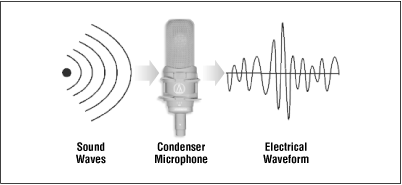
A transducer is a device that changes information from one form to another. A microphone is a type of transducer device that converts sound waveforms into electrical waveforms, as shown in Figure 3-1. There are three main transducer designs for microphones:
Dynamic microphones
Condenser microphones
Lavaliere clip-on microphones
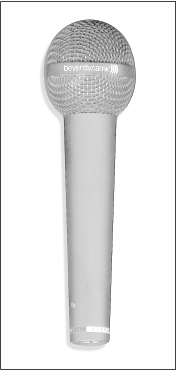
A dynamic microphone is recommended for live concerts and studio or radio voice-overs. A Beyer dynamic microphone is shown in Figure 3-2. Dynamic microphones are more suitable for live recordings because of their durability and reliability. Plus, they do not overload or distort as easily as condenser microphones. They also tend to be less expensive than condensers, but generally do not deliver the even response across all frequencies needed in a studio recording. Unlike dynamic microphones, which amplify certain frequency ranges more than others, condenser microphones amplify all sounds across the frequency spectrum equally, thus producing a more accurate reproduction of the original sound source.
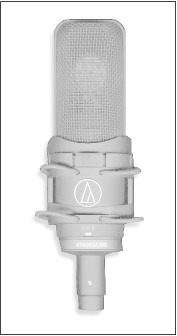
For capturing a more accurate, "flat" signal, use a condenser microphone. An Audio-Technica 4050 condenser mic is shown in Figure 3-3. Condenser microphones are better at reproducing the soft decays and subtle nuances of quieter sounds and are widely used in studio recordings where noise rejection and public address (PA) feedback are not a concern. They are most commonly used for recording acoustic instruments and voices. A good condenser microphone introduces less signal noise than a dynamic microphone and more accurately reproduces the complete frequency spectrum between 20 Hz and 20,000 Hz.
While we recommend a high-quality, all-purpose condenser microphone for most studio recordings, a large diaphragm condenser microphone can be too sensitive for extremely loud, continuous sounds like those from an electric guitar. A less sensitive dynamic microphone will pick up a smoother guitar sound without capturing every little high-end crackle.
Thumbnail-size lavaliere microphones are inconspicuous and portable, and can be easily placed close to the direct source of someone's voice. They are commonly used for video shoots and television talk shows. Using a lavaliere clip-on microphone and a hidden, portable DAT machine make the recording process less intrusive to the subject.
A lavaliere microphone does not work well for recording live concerts or for ambient field recording. Another disadvantage is that one mic can capture only one voice; capturing multiple voices requires several lavaliere microphones and an additional mixing board.
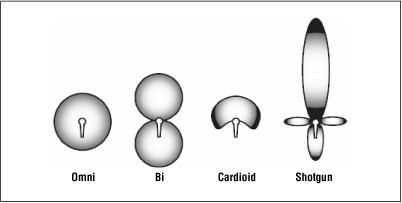
All microphones employ one or more of the four directionality or pick-up patterns. The four patterns are:
Omnidirectional microphones capture sounds equally from all angles. They are commonly used for recording multiple instruments and voices.
Bidirectional microphones capture sounds directly in front and in back of the capsule. A bidirectional mic is commonly used to record vocal duets or is placed above an acoustic instrument. Bidirectional microphones reject sounds from the sides, making them useful for situations where an unwanted source is present at 90 degrees, for example. They can also exhibit what is known as the proximity effect. Often employed by radio DJs and singers, this effect amplifies the bass frequencies of a voice as it gets closer to the microphone.
Cardioid microphones capture the sounds directly in front of the capsule, providing maximum noise rejection. Cardioid mics are used for live-concert vocal recording and amplification because the pick-up pattern does not capture loud, distortion-causing sounds such as those from a PA system. They also amplify the bass frequencies of a voice as it gets closer to the microphone, creating the proximity effect.
Shotgun microphones contain a recording capsule embedded in a long hollow tube. The capsule picks up a highly exaggerated hypercardioid pattern of sounds far in front and in back of the microphone. Shotgun mics are used for recording in an environment where a narrow pick-up range is needed, such as an interview conducted in a car.
Certain recording situations call for the use of different pick-up patterns. For example, using a cardioid microphone is more effective than an omnidirectional microphone when interviewing someone on a busy tradeshow floor. If, however, you wanted to capture the atmosphere and ambience of the tradeshow, the omnidirectional mic grabs all the surrounding sounds more evenly.
Recording versus amplification
It is not always necessary to record a performance with the same microphones used to amplify the performance to the audience. If you use separate microphones for recording, feedback becomes a non-issue and you are free to select from a wider range of more sensitive condenser microphones.
For an on-the-street interview, use a shotgun microphone that has a hypercardioid pick-up pattern. A shotgun mic allows for broader rejection of sounds outside its narrow pick-up range. A live vocal performance might call for a cardioid dynamic microphone with a limited pick-up range; this type of mic should eliminate feedback created when a microphone re-amplifies the amplified sounds coming from a PA system.
Figure 3-4 illustrates the area of maximum pick-up of the four most common patterns. Remember, all microphones pick up a small amount of sound outside of their respective pick-up patterns.
Very few microphones have a uniform frequency response. Most have bumps at various frequencies that add coloration to the sound. Dynamic cardioid microphones, often called "voice or PA microphones," typically have a boost in the 2 kHz to 5 kHz region, as this frequency range seems to make words easier to understand. Condenser microphones used for recording and music microphones are generally flatter, but have enough coloration to make the proper match of mic-to-instrument -- a critical part of the recording art.
Some microphones have switches to change the frequency response. A common switch is to a low-frequency cut that reduces the proximity effect on a cardioid mic or low freqency rumble on a condenser mic.
When shopping for a microphone, look for a model that has a good high-frequency response and low noise. A high-quality mic should capture the entire frequency spectrum from 20 Hz to 20 kHz with a low 11dB of self noise. Inexpensive microphones generally only capture the frequencies between 50 Hz to 15 kHz and add a noticeable amount of noise to the audio signal. Microphones also come in high-impedance and low-impedance versions. Impedance is the amount of opposition to current flow. High-impedance types usually have single-conductor miniature phone plugs on an attached cable; lowimpedance mics have three-prong "XLR" connectors. Good microphones are invariably low-impedance. A high-impedance mic can be used in a pinch, but it will hum if the cable is longer than two meters.
When recording, you want the loudest sound, or the highest amplitude point of a given passage of music or narration, to peak just under the maximum input level. By maximizing your input levels, you ensure that softer passages of music or quieter sounds stay well above the noise floor. Several factors determine your target input level: the loudness of the sound itself, the proximity of the microphone to the sound source, and the quality of your microphone pre-amp.
A good mic pre-amp boosts the weak output signal of a microphone without introducing signal noise, just as a telescope magnifies the image seen through its lens. Microphone output signals are inherently weak and must be amplified before entering your sound card or recorder. By amplifying the output signal to your sound card or tape recorder, you improve the quality of your recording.
Many sound cards have built-in mic pre-amp inputs for a microphone. You should avoid using these internal pre-amps whenever possible. Poor quality pre-amps add noise and low-level distortion to your recording, especially when capturing soft or quiet sounds. For a little extra investment, an external "outboard" mic pre-amp will noticeably increase the quality of your audio, especially if you are using an inexpensive sound card. Using a separate outboard mic pre-amp ensures that you are delivering a loud, or "hot," signal into your mixer or sound card. If you use the built-in pre-amp, make sure your microphone is properly placed -- approximately six inches from the source -- to get the hottest signal possible.
Audio mixers blend or mix several discrete audio sources into a composite mono or stereo signal (hence the term "mixer). The mixer is the Grand Central Station of the sound studio. In addition to blending sounds together, mixing boards connect and route all the input and output signals from one component to another. Mixers save you the hassle of patching together different pieces of equipment for common, day-to-day studio tasks. They are often used for routing output signals from a DAT machine, CD player, or microphone into a sound card or recording device and then back out to a set of studio reference speakers.
Mixers generally contain built-in mic pre-amps and signal-processing capabilities such as equalization. For recording amplified or loud sounds, the built-in mixer mic pre-amps are ordinarily adequate. We recommend using a dedicated one- or two-channel outboard mic pre-amp for recording softer sounds, such as voice and acoustic instruments. High-quality mic pre-amp components are expensive; manufacturers of sub-$1,000 16- and 24-channel mixers therefore are less likely to use high-grade components.
The key specification of a mixing board is the signal-to-noise ratio, measured in dB. A good mixer with a +95dB signal-to-noise ratio or higher introduces less noise into the signal than will a low-end mixer. To confirm whether a mixer has low noise, plug in a pair of headphones or reference speakers and turn up all the faders on the board without turning on any sound. Then turn up the main output levels. If you hear excessive hiss and noise, the mixer has a poor signal-to-noise ratio. If you hear just a little hiss, or none at all, the mixer has a good signal-to-noise ratio. This is the primary difference between a $30,000 16-track mixer and a $1,500 16-track mixer.
A compressor is used to even out and compress incoming audio signals that vary in dynamic range, such as a singer going from a soft whisper to a resounding scream. In the digital recording environment, a compressor improves sound quality and prevents distortion by reducing the amplitude or volume of incoming sounds that peak above the 0dB-distortion range. When loud sounds that would otherwise cause distortion are reduced in amplitude by the compressor, you can increase the input level of your microphone to get a hotter recording signal.
High-quality studio reference speakers accurately reproduce a "flat," transparent representation of your audio without adding coloration, distortion, noise, or equalization.
Home stereo speakers, by contrast, are designed to boost the high and low audio frequencies to provide a richer, more pleasant sound. Reference speakers are designed to give you the most accurate sound, not the most pleasant.
Just as every computer monitor screen displays colors differently, every brand of studio reference speakers produces a slightly different sound. The most important thing is to use the same set of speakers every time you listen to your audio mixes. A favorite trick of savvy recording engineers is to play hit CDs on their reference speakers to hear how other mixes sound on their system.
Digital audio tape (DAT) is the professional recording standard for digital stereo mix-downs and mastering. A two-track DAT cartridge looks and functions much like a miniaturized VHS tape. And a DAT cartridge is smaller and cheaper ($12) than the previous standard, analog tape reels ($40).
DAT machines come in two forms: the small portable recorders for outdoor field recording and the larger, rack-mount varieties for professional studio recording. High-end portable DAT players ($1,200 to $3,000) pack the same features as the studio rack-mounts, including XLR-balanced inputs and outputs (three-prong connectors versus mini-plugs or RCA jacks) for maximum recording quality and low signal noise. If your budget allows, avoid a DAT player with stereo mini plugs -- spend the extra money and get the professional quality features.
Several sets of high quality headphones that completely cover the ears are necessary for studio recording sessions and often for detailed sound editing. Studio reference headphones let you hear subtle details and noises that would be otherwise hard to detect, especially if your reference speakers are placed in an environment with excessive noise. Headphones also serve as a monitoring system during recording sessions where a live microphone is located near in the studio reference speakers. Do not use cheap headphones.
Pop screens are essential for recording voices in the studio. A pop screen is a circular hoop with a thin nylon covering that sits directly between the speaker's mouth and the microphone. Without it, your recording likely will include wind and breath noises, such as explosive "P" words. Figure 3-5 shows a typical pop screen setup. Most music stores carry them. In a pinch, you can get away with a homemade screen. Take some stocking hose and stretch it over a framing device, such as a bent metal clothes hanger or an embroidery hoop, and tape it to the mic stand with duct tape.

Cables are the last item anyone wants to spend money on, but since they carry all your vital electrical signals, it is worth the extra expense to buy high-quality cables with reinforced connectors and proper shielding. Cheap, poor-quality cables produce noise and interference, and they frequently break.
|  | |
| 2.3. Summary |  | 3.2. Recording techniques |

Copyright © 2002 O'Reilly & Associates. All rights reserved.