 | Designing Web Audio |  |

RealPix is the markup language that serves as a metafile for the static graphics used in G2 presentations. RealPix supports delivery of JPEGs and GIFs. While these graphic formats are themselves static images, you can nonetheless create compelling slideshows with motion and transition effects, all coded within RealPix.
RealPix also offers powerful timeline capabilities with millisecond control, allowing you to synchronize the appearance and behavior of images to other streaming media files, including audio tracks and videos.
JPEGTRAN utility
If you are authoring RealPix files by hand, optimize your images with a utility called JPEGTRAN. It is included with the G2 authoring kit. If you are authoring with a graphical application such as RealSlideshow, it automatically optimizes your images for streaming.
RealPix files begin with the opening <imfl> tag and end with the closing </imfl> tag. All other RealPix tags are self-closing, and as with SMIL, they must end with a forward slash (/). All tag and attribute names must be lowercase, and attribute values must be enclosed within double quotation marks.
RealPix files have three basic components: the header, the image tags, and the effect tags.
All header information is contained within the <head/> tag. The associated attributes allow you to define title, author, and copyright as well as set necessary parameters such as the presentation dimensions, duration, time format, and streaming bitrate. For example:
<head
    name="My RealPix Show"
    author="Jane Doe"
    copyright="© My Company, 1999"
    timeformat="dd:hh:mm:ss.xyz"
    duration="24"
    background="#FFFFFF"
    bitrate="20000"
    width="200"
    height="200"/>
The header is followed by a series of <image/> tags, each one providing the filename and location of an image to be used in the presentation and assigning it a unique numerical handle. Example 7-3 is a RealPix slideshow that uses three images. The first two images are located in the same directory as the .rp file, and the third is located one directory below the .rp file.
<image handle="1" name="frog.jpg"/>
<image handle="2" name="cat.jpg"/>
<image handle="3" name="/images/dog.jpg"/>
Next, timing and behavior of the images are coded in a series of effect tags, which use the target attribute to refer to the appropriate image where the target value is the image's handle number. The five RealPix effect tags are <fadein/>, <fadeout/>, <crossfade/>, <wipe/>, and <viewchange/>.
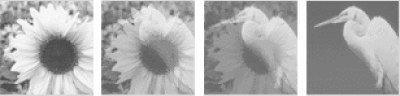
The <fadein/> tag creates a transition from a background color to the new image. The <fadeout/> tag provides the opposite functionality, creating a transition from an existing image to a background color. The <crossfade/> tag creates a transition between an existing image to a new one. Figures Figure 7-3 through Figure 7-5 display examples of the <fadein/>, <fadeout/>, and <crossfade/> effects.


Each effect tag also has a series of attributes that assign its timing and placement. The start attribute marks the time from the beginning of the presentation to when that effect should begin to take place. The duration attribute refers to the length of time it takes for that effect to complete, not the length of time that the image will display.
In Example 7-4, the background color described in the header first fills the presentation region. One second later, the first image begins to fade in. The fade-in takes two seconds to complete. Seven seconds later (at the 10-second mark of the overall show), the first image begins to crossfade into the second image. This transition takes three seconds to complete. Finally, 20 seconds after the show began, over a period of 4 seconds, the second image begins to fade out, to a solid bright red color.
<fadein start="1" handle="1" duration="2"/>
<crossfade start="10" handle="2" duration="3"/>
<fadeout start="20" duration="4" color="#FF0000"/>
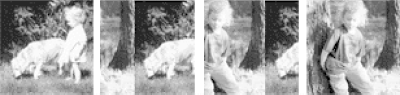
The <wipe/> tag creates a transition from one image to another, either by covering the displayed image or by pushing it out of the way with a sliding effect (see Figure 7-6). The required direction and type attributes assign the basic parameters.
In Example 7-5, the first image begins to appear two seconds after the presentation begins. It moves into and fills the region, from left to right, for a duration of three seconds. At the 10-second mark, over a 3-second period of time, a second image begins to appear at the top of the region, and pushes the first image down and out of the region, until only the second image is visible.
<wipe target="1" type="normal" direction="right" duration="3"
    start="2"/>
<wipe target="2" type="push" direction="down" duration="3" start="10"/>
The <viewchange/> tag provides ways to zoom in on a portion of an image, pan back from it, make it appear larger or smaller, or move it from one area of the player window to another. These movements rely heavily on the source and destination placement and size attributes, which set the dimensions and the (x,y) coordinate of the upper-left corner of the image. The source and destination coordinate and size attributes may be used with all five effects but are most frequently used to assign <viewchange/> behavior. These attributes include:
X coordinate of the source rectangle
Y coordinate of the source rectangle
Width of the source rectangle
Height of the source rectangle
X coordinate of the destination rectangle
Y coordinate of the destination rectangle
Width of the destination rectangle
Height of the destination rectangle
The <viewchange/> tag does not use the target attribute; it applies to the image with the most recent effect. In Example 7-6, an image fades into the presentation region, at a size of 120 x 120, with the top left corner of the image at the (40,40) coordinate of the overall region. At the four-second mark, the image begins to shrink to a quarter of its original size, having dimensions of 60 x 60. It simultaneously moves across the presentation region so that its upper-left corner is at the (20,100) coordinate of the overall region.
<fadein start="1" duration="2" target="1" dstx="40" dsty="40" dstw="120"
    dsth="120"/>
<viewchange start="4" duration="3" srcx="40" srcy="40" srcw="120"
    srch="120" dstx="20" dsty="100" dstw="60" dsth="60"/>
It is best to maintain the aspect ratio of an image when altering its size with <viewchange/>. In Example 7-6, the aspect ratio is maintained, and a graphic at its original size of 120 x 120 is reduced perfectly to 25% of its original size to 60 x 60. If, however, you try to reduce the image to 60 x 40, the image itself becomes distorted. RealPix shrinks the image to your designated size, but maintains the 60 x 60 aspect ratio area, and displays two black lines, each 10 pixels wide, on either side of the image. Figure 7-7 shows the <viewchange/> tag at work.

RealPix supports hyperlinking to HTML pages, which display in a web browser window. This is accomplished through the use of the url attribute in an effect tag:
<fadein target="1" start="1" duration="3"
    url="http://www.mycompany.com"/>
In the initial releases of RealPix, a graphic could not be linked to another SMIL file to be played within the G2 player (6.0). RealPlayer 7.0 offers hyperlinking support between SMIL files in a RealPix presentation.
For complete RealPix documentation, visit RealNetwork's RealPix Authoring Guide at http://service.real.com/help/library/guides/realpix/realpix.htm.
|  | |
| 7.2. SMIL |  | 7.4. RealText |

Copyright © 2002 O'Reilly & Associates. All rights reserved.