 |  |

| |
Servlet Syntax
WAR Files and Deployment
Another Servlet Example
Stylesheet Caching Revisited
Servlet Threading Issues
XSLT and servlets are a natural fit. Java is a cross-platform programming language, XML provides portable data, and XSLT provides a way to transform that data without cluttering up your servlet code with HTML. Because your data can be transformed into many different formats, you can also achieve portability across a variety of browsers and other devices. Best of all, a clean separation between data, presentation, and programming logic allow changes to be made to the look and feel of a web site without digging in to Java code. This makes it possible, for example, to sell highly customizable web applications. You can encourage your customers to modify the XSLT stylesheets to create custom page layouts and corporate logos, while preventing access to your internal Java business logic.
As discussed in previous chapters, an initial challenge faced with XSLT and servlets is the initial configuration. Getting started with a web application is typically harder than client-only applications because there are more pieces to assemble. With a Swing application, for instance, you can start with a single class that has a main( ) method. But with a web application, you must create an XML deployment descriptor in addition to the servlet, package everything up into a WAR file, and properly deploy to a servlet container. When errors occur, you see something like "HTTP 404 -- File not found," which is not particularly helpful.
The goal of this chapter is to introduce servlet syntax with particular emphasis on configuration and deployment issues. Once servlet syntax has been covered, integration with XSLT stylesheets and XML is covered, illustrated by the implementation of a basic web application. By the time you have worked through this material, you should have confidence to move on to the more complicated examples found in the remainder of this book.
Servlet architecture was covered in Chapter 4, "Java-Based Web Technologies", along with comparisons to many other approaches. The architecture of a system is a mile-high view, ignoring implementation details so you can focus on the big picture. We now need to dig into the low-level syntax issues to proceed with the really interesting examples in later chapters. For a complete discussion of servlets, check out Jason Hunter's Java Servlet Programming (O'Reilly). Be sure to look for the second edition because so much has changed in the servlet world since this book was first published.
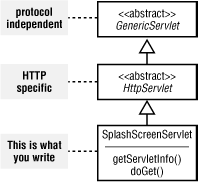
Our first servlet example will produce an application splash screen. The servlet will receive a request from a browser and output a simple HTML web page. Figure 6-1 contains the class diagram for SplashScreenServlet, which extends from HttpServlet.
When writing servlets, you almost always extend from HttpServlet. In our example, we override the doGet( ) method, which is called every time the browser issues an HTTP GET request to the server. GET requests occur whenever the user types in a URL, clicks on a hyperlink, or submits an HTML form with GET as the method attribute. The other common type of request is POST, which is used by HTML forms with POST as the method attribute. For example:
<form action="someServlet" method="POST">
...form contents
</form>
In the case of POST requests, your servlet simply overrides the doPost( ) method instead of doGet( ). Each of these methods takes two parameters: HttpServletRequest and HttpServletResponse. The request contains information from the client to the servlet, and the response allows the servlet to send data back to the client. This correlates directly to the request/response nature of HTTP itself. Example 6-1 contains the complete source code for our simple servlet.
package chap6;

import java.io.*;
import javax.servlet.*;
import javax.servlet.http.*;

/**
 * A simple Servlet example that displays a "Splash Screen"
 * for a web application.
 */
public class SplashScreenServlet extends HttpServlet {
  public String getServletInfo( ) {
    return "Shows an application splash screen.";
  }

  protected void doGet(HttpServletRequest request,
                    HttpServletResponse response)
      throws IOException, ServletException {

    // demonstrate how to get parameters from the request
    String nextURL = request.getParameter("nextURL");
    if (nextURL == null) {
      nextURL = "/";
    }

    response.setContentType("text/html");
    PrintWriter pw = response.getWriter( );
    pw.println("<html>");
    pw.println("<head><title>Splash Screen</title></head>");
    pw.println("<body>");

    pw.println("<div align='center' style='border: 1px navy solid;'>");
    pw.println("<h1>Welcome to Java and XSLT</h1>");
    pw.println("<h3>O'Reilly and Associates</h3>");
    pw.println("<p>First Edition, 2001</p><hr>");
    pw.println("<a href='" + nextURL + "'>Click here to continue...</a>");
    pw.println("</div>");
    pw.println("</body>");
    pw.println("</html>");
  }
}
Beginning with the import statements, note that the servlet API is in the javax.servlet and javax.servlet.http packages. These packages are not part of the Java 2 Standard Edition; they are considered a required API of the Java 2 Platform Enterprise Edition. Although many servlet implementations are available, Apache's Tomcat is the reference implementation officially sanctioned by Sun. Every example in this book works with Version 4.0 of Tomcat and should also work on any compliant servlet implementation. You can download Tomcat at http://jakarta.apache.org.
As shown in Figure 6-1, SplashScreenServlet is a subclass of HttpServlet. The first method we override is getServletInfo( ) , which simply returns a brief description of this servlet. Although optional, this text will show up in the administrative console of many servlet containers.
The doGet( ) method is next, which is designed to handle each client request. It is important to remember that this method needs to be thread-safe, because many clients could potentially share this servlet instance and call doGet( ) concurrently. You may notice that doGet( ) is a protected method. The call sequence is as follows:
The servlet container invokes the service( ) method on HttpServlet.
HttpServlet figures out the type of request (GET, POST, ...).
HttpServlet invokes the corresponding method (doGet( ), doPost( ), ...).
Since the doGet( ) method is called from its parent class, it can be protected. If you do not override the doGet( ) method, the default behavior in HttpServlet is to return an error page back to the client. If you also want to support POST, you must override the doPost( ) method. One common technique is to have the doGet( ) method call the doPost( ) method, or vice-versa. This allows the same servlet to support both GET and POST without duplicating any code.
The doGet( ) implementation is very straightforward. The first thing it does is check for the existence of a parameter called nextURL. This is part of the request that the browser issues to the servlet. For example, typing the following URL into your browser will include the next URL parameter:
http://localhost:8080/chap6/splash?nextURL=http://www.oreilly.com
If the nextURL parameter is not specified, its value will be null. For this reason, servlets must always check for null when getting parameters from the request:
String nextURL = request.getParameter("nextURL");
if (nextURL == null) {
  nextURL = "/";
}
In our example, null causes an error, so we replace nextURL with a forward slash character (/). As you might guess, this is a relative URL that points to the root directory. In the case of a servlet running on Tomcat, the root directory will point to Tomcat's home page. This is not the same as the root directory on your file system. In Tomcat, the root directory can be found under TOMCAT_HOME/webapps/ROOT, where TOMCAT_HOME points to the installation directory of Tomcat.
The getParameter( ) method is also used for retrieving values from an HTML form. When an HTML form is submitted, each component on the form should have a name associated with it, such as firstName, lastName, or ssn. The servlet retrieves the form values simply by calling request.getParameter( ) for each form element. It is always a good idea to check for null and trim whitespace before accepting any of these parameters. When the form element is missing, the parameter value will be null. This could indicate an error in your HTML or perhaps an intentional attack on your web site.
The HttpServletResponse class provides access to either a PrintWriter or an OutputStream, depending on whether you wish to send text or binary data to the client. For HTML or XML data, use the HttpServletResponse.getWriter( ) method. For images or other types of binary data, use the HttpServletResponse.getOutputStream( ) method. You may also note that we set the content type of the response prior to getting the writer:
response.setContentType("text/html");
PrintWriter pw = response.getWriter( );
This is important because the HTTP response consists of a header followed by the actual content. The content type is one of the header values, so it must be sent prior to the actual data. Without going into too many servlet details, it is a good practice to always set the content type before getting the writer. In future examples, we will occasionally use text/xml as the content type, but only when sending raw XML data to the client.
The remainder of SplashScreenServlet simply prints out an HTML response:
pw.println("<html>");
pw.println("<head><title>Splash Screen</title></head>");
pw.println("<body>");

pw.println("<div align='center' style='border: 1px navy solid;'>");
pw.println("<h1>Welcome to Java and XSLT</h1>");
pw.println("<h3>O'Reilly and Associates</h3>");
pw.println("<p>First Edition, 2001</p><hr>");
pw.println("<a href='" + nextURL + "'>Click here to continue...</a>");
pw.println("</div>");
pw.println("</body>");
pw.println("</html>");
As you can see, the nextURL parameter is used to create a hyperlink to the next page. This is why a value of null is unacceptable for this example.
This approach works fine for simple examples, but quickly gets out of hand for complex pages. This is because all but the most basic web pages require hundreds, if not thousands, of lines of HTML to create fancy tables, colors, and graphics. For reasons discussed in Chapter 5, "XSLT Processing with Java", hardcoding that HTML into the servlet is simply unacceptable in a sophisticated web application.
|  | |
| 5.4. Stylesheet Compilation |  | 6.2. WAR Files and Deployment |

Copyright © 2002 O'Reilly & Associates. All rights reserved.